

Chào các bạn, Postman có lẽ là công cụ quá quen thuộc để tạo các HTTP request và làm việc với web API rồi.
Trong bài viết tiếp theo này mình sẽ giới thiệu với các bạn một công cụ khác để quản lý các API trong ứng dụng đó là Swagger.

Trong bài viết này mình sẽ tập trung vào cách cài đặt cũng như là sử dụng Swagger trong một ứng dụng Spring Boot.
#1. Cài đặt
Đầu tiên mình sẽ tạo một project Spring Boot đơn giản với nội dung file pom.xml như sau.
<?xml version="1.0" encoding="UTF-8"?>
<project xmlns="http://maven.apache.org/POM/4.0.0" xmlns:xsi="http://www.w3.org/2001/XMLSchema-instance"
	xsi:schemaLocation="http://maven.apache.org/POM/4.0.0 https://maven.apache.org/xsd/maven-4.0.0.xsd">
	<modelVersion>4.0.0</modelVersion>
	<parent>
		<groupId>org.springframework.boot</groupId>
		<artifactId>spring-boot-starter-parent</artifactId>
		<version>2.4.4</version>
		<relativePath/> <!-- lookup parent from repository -->
	</parent>
	<groupId>com.laptrinhb2a</groupId>
	<artifactId>swagger-tutorials</artifactId>
	<version>0.0.1-SNAPSHOT</version>
	<name>swagger-tutorials</name>
	<description>Swagger tutorials for Spring Boot</description>
	<properties>
		<java.version>11</java.version>
	</properties>
	<dependencies>
		<dependency>
			<groupId>org.springframework.boot</groupId>
			<artifactId>spring-boot-starter-web</artifactId>
		</dependency>

		<dependency>
			<groupId>org.springframework.boot</groupId>
			<artifactId>spring-boot-starter-test</artifactId>
			<scope>test</scope>
		</dependency>
	</dependencies>

	<build>
		<plugins>
			<plugin>
				<groupId>org.springframework.boot</groupId>
				<artifactId>spring-boot-maven-plugin</artifactId>
			</plugin>
		</plugins>
	</build>

</project>
springfox-swagger2 và springfox-swagger-ui vào file pom.xml như sau:
<?xml version="1.0" encoding="UTF-8"?>
<project xmlns="http://maven.apache.org/POM/4.0.0" xmlns:xsi="http://www.w3.org/2001/XMLSchema-instance"
	xsi:schemaLocation="http://maven.apache.org/POM/4.0.0 https://maven.apache.org/xsd/maven-4.0.0.xsd">
	<modelVersion>4.0.0</modelVersion>
	<parent>
		<groupId>org.springframework.boot</groupId>
		<artifactId>spring-boot-starter-parent</artifactId>
		<version>2.4.4</version>
		<relativePath/> <!-- lookup parent from repository -->
	</parent>
	<groupId>com.laptrinhb2a</groupId>
	<artifactId>swagger-tutorials</artifactId>
	<version>0.0.1-SNAPSHOT</version>
	<name>swagger-tutorials</name>
	<description>Swagger tutorials for Spring Boot</description>
	<properties>
		<java.version>11</java.version>
	</properties>
	<dependencies>
		<dependency>
			<groupId>org.springframework.boot</groupId>
			<artifactId>spring-boot-starter-web</artifactId>
		</dependency>

		<dependency>
		    <groupId>io.springfox</groupId>
		    <artifactId>springfox-swagger2</artifactId>
		    <version>2.9.2</version>
		</dependency>
		<dependency>
		    <groupId>io.springfox</groupId>
		    <artifactId>springfox-swagger-ui</artifactId>
		    <version>2.9.2</version>
		</dependency>

		<dependency>
			<groupId>org.springframework.boot</groupId>
			<artifactId>spring-boot-starter-test</artifactId>
			<scope>test</scope>
		</dependency>
	</dependencies>

	<build>
		<plugins>
			<plugin>
				<groupId>org.springframework.boot</groupId>
				<artifactId>spring-boot-maven-plugin</artifactId>
			</plugin>
		</plugins>
	</build>

</project>
Giải thích một chút, ở đây chúng ta đã thêm 2 dependency. Thứ nhất
springfox-swagger2 là một triển khai của swagger được sử dụng cho Spring Boot. Có nghĩa là khi thêm thư viện này vào ứng dụng Spring Boot thì bạn có thể sử dụng Swagger trong ứng dụng Spring Boot đó.
Thứ hai
springfox-swagger-ui là một tích hợp về giao diện giúp cho quá trình làm việc với Swagger được giao diện hóa.Bây giờ mình sẽ cùng các bạn cấu hình trong ứng dụng để sử dụng được Swagger. Các bạn tạo một class là
SwaggerConfig với nội dung file như sau:package com.laptrinhb2a.swaggertutorials;
import org.springframework.context.annotation.Bean;
import org.springframework.context.annotation.Configuration;
import springfox.documentation.builders.PathSelectors;
import springfox.documentation.builders.RequestHandlerSelectors;
import springfox.documentation.spi.DocumentationType;
import springfox.documentation.spring.web.plugins.Docket;
import springfox.documentation.swagger2.annotations.EnableSwagger2;
@Configuration
@EnableSwagger2
public class SwaggerConfig {
@Bean
public Docket api() {
return new Docket(DocumentationType.SWAGGER_2)
.select()
.apis(RequestHandlerSelectors.any())
.paths(PathSelectors.any())
.build();
}
}
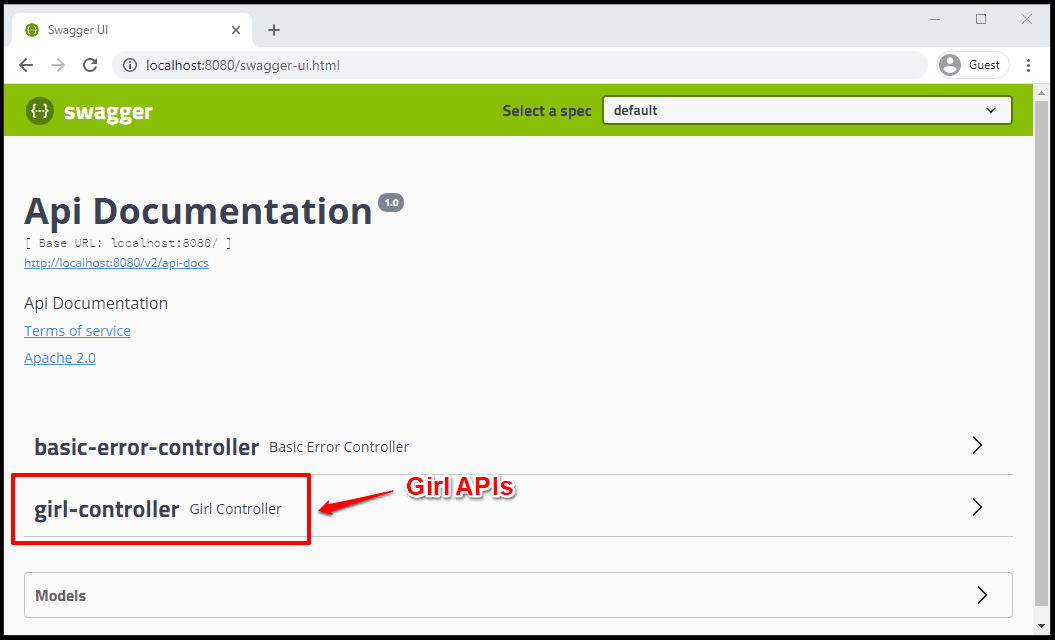
#2. Sử dụng
Đầu tiên các bạn cứ viết các API bình thường thôi. Trong bài viết này mình sẽ tạo một class
Girl sau đó viết các API thêm, lấy danh sách cơ bản nha.Ok, đây là class
Girl của mình (rất đơn giản với 2 tiêu chí cơ bản isBeautiful và height 😉😉😉)package com.laptrinhb2a.swaggertutorials;
package com.laptrinhb2a.swaggertutorials;
public class Girl {
private String name;
private boolean isBeautiful;
private int height;
public Girl() {
}
public Girl(String name, boolean isBeautiful, int height) {
this.name = name;
this.isBeautiful = isBeautiful;
this.height = height;
}
public String getName() {
return name;
}
public void setName(String name) {
this.name = name;
}
public boolean isBeautiful() {
return isBeautiful;
}
public void setBeautiful(boolean isBeautiful) {
this.isBeautiful = isBeautiful;
}
public int getHeight() {
return height;
}
public void setHeight(int height) {
this.height = height;
}
}
GirlController với hai API cơ bản đó là:+
/getListBeautifulGirl - lấy ra danh sách các Girl xinh đẹp theo điều kiện xinh hay không và chiều cao.+
/crushBeautifulGirl - thêm Girl xinh vào danh sách crush 😁😁😁package com.laptrinhb2a.swaggertutorials;
import java.util.ArrayList;
import java.util.List;
import org.springframework.http.ResponseEntity;
import org.springframework.web.bind.annotation.GetMapping;
import org.springframework.web.bind.annotation.PostMapping;
import org.springframework.web.bind.annotation.RequestParam;
import org.springframework.web.bind.annotation.RestController;
@RestController
public class GirlController {
List<Girl> girls = new ArrayList<Girl>();
List<Girl> beautifulGirls = new ArrayList<Girl>();
public GirlController() {
girls.add(new Girl("Hoa", true, 162));
girls.add(new Girl("Huyền", false, 150));
girls.add(new Girl("Hằng", true, 158));
girls.add(new Girl("Hạnh", false, 165));
}
@GetMapping("/getListBeautifulGirl")
public ResponseEntity<List<Girl>> getListGirls() {
girls.forEach(girl -> {
if(girl.isBeautiful() == true && girl.getHeight() >= 160)
this.beautifulGirls.add(girl);
});
return ResponseEntity.ok(this.beautifulGirls);
}
@PostMapping("/crushBeautifulGirl")
public ResponseEntity<Boolean> crushBeautifulGirl(
@RequestParam String name,
@RequestParam boolean isBeautiful,
@RequestParam int height) {
if(isBeautiful == true && height >= 160) {
this.beautifulGirls.add(new Girl(name, isBeautiful, height));
return ResponseEntity.ok(true);
}
return ResponseEntity.ok(false);
}
}NOTE: Cho ae nào muốn tải code về chạy luôn thì có thể download tại đây nha.


#3.Kết luận
Oki, vậy là chúng ta biết thêm một công cụ mới để làm việc với RESTful API. Thực tế làm việc với Swagger và Postman không khác nhau quá nhiều.
Nhưng với Postman thì việc tạo request sẽ linh hoạt hơn, trong khi với Swagger lại gói gọn theo từng ứng dụng.
Sử dụng công cụ nào còn tùy thuộc vào hoàn cảnh cụ thể và mức độ phù hợp với dự án nữa nên các bạn không cần phải quá cân nhắc.
Hẹn gặp lại các bạn trong các bài viết tiếp theo nha!
#4.Tham khảo
![[Spring Boot Tips] - Sử dụng Swagger trong dự án Spring Boot](https://blogger.googleusercontent.com/img/b/R29vZ2xl/AVvXsEinnhkjjdc2rOx93J1UNdkAR9pCa64q7aYrB4sBxf6zk5WhSduwwDgSWVBJdMuNcUOrBdvG1eyete1JiBkcJAuw6Xcm4Gj4fY4DeTk_HcV2ODhTBlhf8uxS5hZmqlLvf4ekrPj4yePXZvk/s72-c/rrrr.png)
![[SQL] - Derived Tables trong MySQL](https://blogger.googleusercontent.com/img/b/R29vZ2xl/AVvXsEi9AWQmqu47a9fQdVxL7zjhAfDYfHVtqR-rftvZrFHvGMrm_HbctQHySQUSJWHCbXYGR7T-RiujqYvJab6eZxE2awi7uChGr59NNFxeAxb6dQnDwFWOVOJ_W4uPiXhXgDmHrKmtrWH2BKs/s72-c/derived_tables.png)
![[Java] - Làm sao kiểm tra chuỗi là EMPTY hay BLANK trong Java?](https://blogger.googleusercontent.com/img/a/AVvXsEgp3ZugzrQvP1hJ8m9EEn7CNZMTpnoth6v4sixt1EaK7-NjlCU3hiZpJsdGh-zwuOATVCc0LZeMrcOl4CxNK1NjxFfSUjc355BnDThevVEV0K13YlNhB08mXzdkz5EEPoG_RkvM2Pr9vq1JwT9rR4fpJIffZ1EYPm23TKIF6lU5qG-V1iduf1y2jQCY=s72-c)

Không có nhận xét nào: